Copyright © Rogue Amoeba Software, Inc. All rights reserved.

Services like Zoom, Skype, FaceTime, and more let you place video and audio calls to connect with co-workers, friends, and family around the world. Unfortunately, the quality of the audio heard on these calls is often less than ideal.
Using SoundSource, it's easy to improve what you hear when taking calls on your Mac. SoundSource's ability to apply effects to any audio makes it the perfect tool to sweeten the sound of your calls.
This article describes several easy adjustments you can make to improve audio quality.
To begin, add your voice calling application to SoundSource so you can adjust its audio. We'll use Zoom throughout this example, but the same instructions apply to any voice calling application.
To add an application to SoundSource, click the Add Favorite button in the lower left of the main window, then select your application. If the application is already open, it will appear in the Running Applications list.

If not, just choose Select Application…, then select your application.
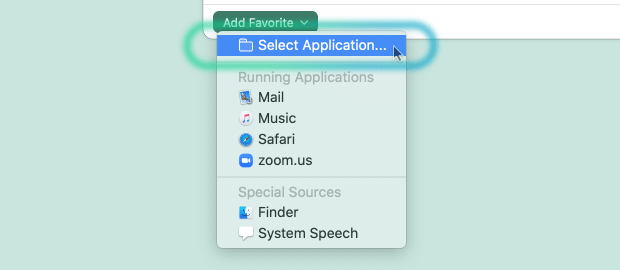
The application will then appear in SoundSource's main window, ready for you to make adjustments.
 SoundSource is now ready to adjust Zoom's audio
Once an application is added to SoundSource, you can adjust its audio by applying effects. We'll provide some simple adjustments you can start with, but there are no specific “right” adjustments to make. You should experiment until the audio sounds good to your ears.
Start by opening the Advanced section to make adjustments. Click the triangle at the far right of the application's entry to access the Advanced area.

One of the simplest improvements you can make is tweaking the 10-Band Equalizer. Switching from the default Flat state to the Spoken Word preset will bring the most important vocal frequencies forward.
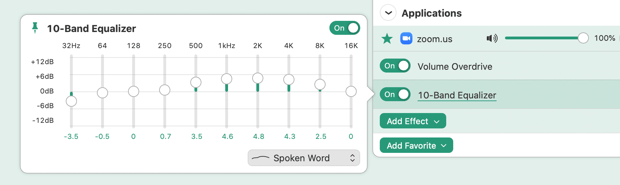 The Equalizer's Spoken Word preset, applied to Zoom
Your Mac includes almost two dozen Audio Unit effects, bundled free as part of MacOS. SoundSource can load these effects and apply them to any audio. To add one of these effects, click Add Effect at the bottom left of the Advanced section, then select the desired effect.
Here are two good places to start:
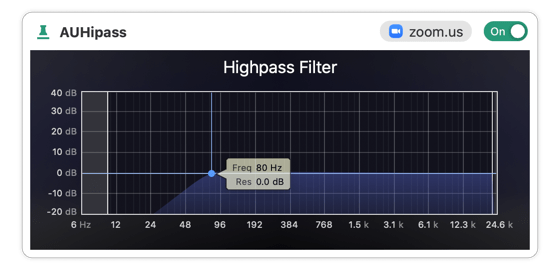
AUHipass: A high pass filter can help remove unnecessary pops and rumble. Try setting this plugin to 80 Hz, and see how it sounds.
AUDynamicsProcessor: This effect offers gating and compression functionality. Gating removes any signal that is under a certain magnitude, while compression tames jumps in volume. You probably know what “radio voice” sounds like, and that's made possible with gating and compression. The following settings are a good place to start:
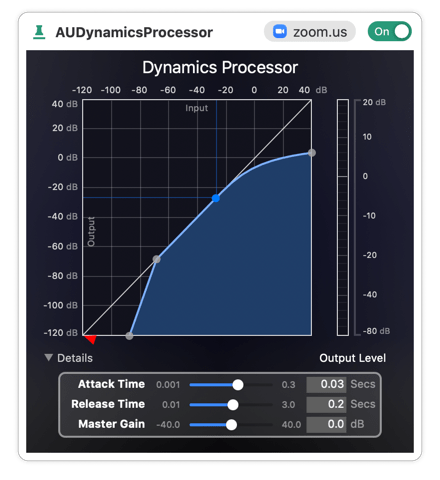
Note that this screenshot is merely a guide. You can tailor the Expansion Threshold and Compression Threshold regions to suit your own setup. Indeed, testing and experimentation is recommended with these plugins, as well as other built-in Audio Units.
For even more powerful audio adjustment, you can invest in third-party Audio Unit plugins created and sold by other software developers. Tools like “NS1 Noise Suppressor” from Waves and “RX Elements” from iZotope perform advanced noise suppression and clean-up.
When third-party Audio Units are installed on your Mac, SoundSource enables you to apply them to any audio. For details on how to use third-party Audio Units with SoundSource, see our this article.
The above adjustments offer a good starting point for improving the quality of audio heard on voice calls. Experiment with these and other audio effects to get the perfect sound.
If you need personal assistance or want to provide feedback, our friendly support team is available via email. Click below to get in touch:
Contact UsWe're amazingly responsive! We strive to reply in under 24 hours.