Copyright © Rogue Amoeba Software, Inc. All rights reserved.
When capturing on-screen content on your Mac, either for a screen recording or for broadcasting that content online, Loopback can help you make sure the exact audio you want is included. To do this, you'll make a Loopback virtual audio device that includes audio from only the specific applications and devices you wish to record. The following example should help you get started.
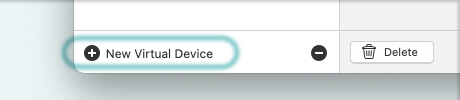
To begin, open Loopback and click on the (+) New Virtual Device button in the bottom left corner of the Loopback window to create a new device. You can name it anything you like. This example uses the default name, “Loopback Audio".
Now, we need to get audio into this device. To begin, you'll likely wish to include your own voice from your mic. Click on the (+) button at the top of the Sources column, then select your microphone from the list of Audio Devices.
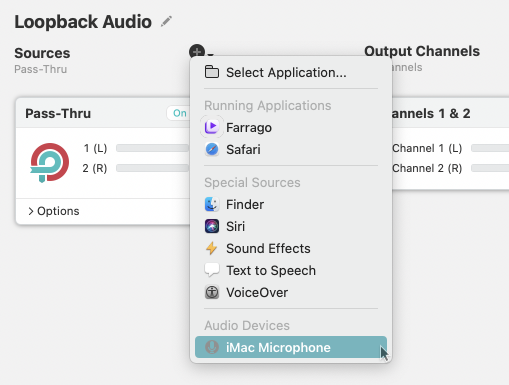
Next, we'll add application sources. Do this by clicking the (+) button at the top of Sources column, then choose your desired applications. Audio output from the applications you add will be picked up by the Loopback device.
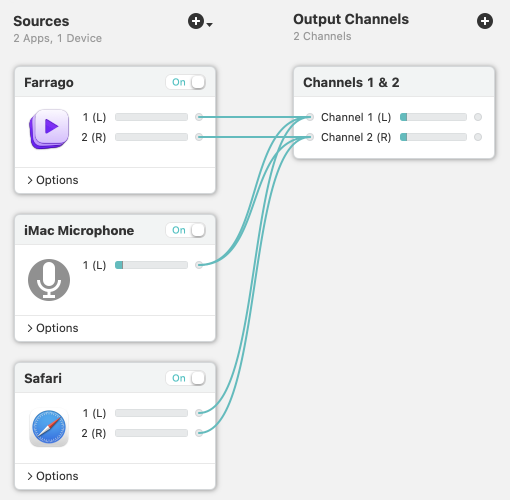
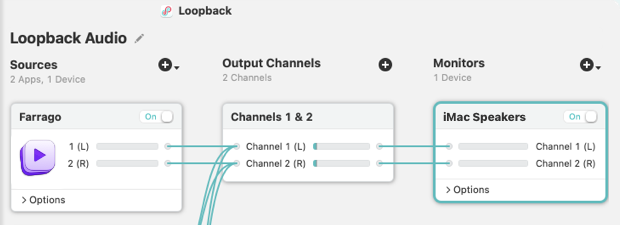
Here, you can see that we've added Safari, as well as our soundboard app Farrago.
By default, when a Loopback device is in use, Loopback mutes audio output from any application sources, preventing audio from these apps from being heard. However, you may wish to to hear audio from some or all of your application sources while you capture your on-screen content. To do this, click on the Options control at the bottom of the application's block to expand its settings, then uncheck the Mute when capturing checkbox. This will allow the app's audio to be heard through your Mac's default output device while Loopback is capturing it.
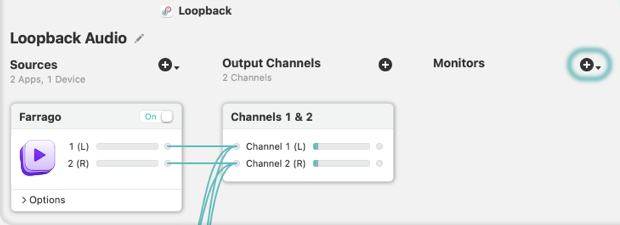
Audio Device blocks lack Options control, but if you want to hear audio from these devices or all of the audio being captured by your Loopback device at once, you can do so with a Monitor block. Click on the (+) button at the top of the Monitors column, then choose an output Audio Device to use.
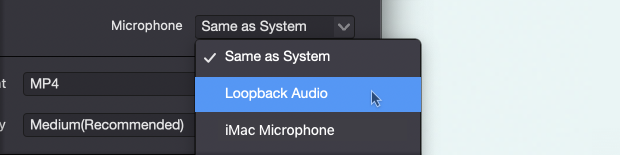
Once your Loopback device is properly configured with both your microphone and desired applications as sources, you can select the device as the input for your screen recording or streaming software.
With the Loopback device thus selected, you're ready to go. Begin your screen recording or live stream, then start talking into your mic and using your applications as needed for your demonstration. The resulting screen recording or broadcast will include the sound from each of your selected application sources, as well as audio from your own microphone as you speak.
If you need personal assistance or want to provide feedback, our friendly support team is available via email. Click below to get in touch:
Contact UsWe're amazingly responsive! We strive to reply in under 24 hours.